

Do you wonder why everyone considers Git as hard to learn? Because people try to hit the books all at once.
It’s in actual a myth, git is not at all hard. In this article, I’ll tell you about the ways and tricks, to become a Git/GitHub champ. So if you are a beginner, this column will help you understand Git and GitHub. And if you already are a master in it, have a look through to remember the stuff that you might have forgotten.
A fleeting introduction
Do you know Git and GitHub are extremely vital tools in the routine of a Software Developer? Now the question arises in the mind that, whether is it possible to learn these tools in the daily routine when you are already learning to code? Or else you need to spare the surplus time to learn the Basics of Git and GitHub? Its answer lies in forthcoming paragraphs. So, grab your coffee, and let’s get started!
You can use this plan to study any programming language like C++, Python, JavaScript, and also HTML and CSS, or even C. It doesn’t matter what tech you are learning - versioning your work with Git is the default way to program.
What is Git? (General idea/Conceptual Understanding)
Before we talk about Git, I need to talk about “Source Control” because Git is not an independent tool and it’s based on systems called source controllers or version controls.
Version Control is the management of changes to documents, computer programs, large websites, and other collections of information.
There are two types of VCS:
- Centralized Version Control System (CVCS)
- Distributed Version Control System (DVCS)
Centralized VCS
A centralized version control system (CVCS) uses a central server to store all files and enables team collaboration. It works on a single repository to which users can directly access a central server.
Please refer to the diagram below to get a better idea of CVCS:
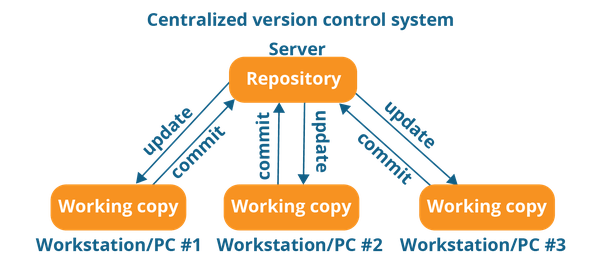
The repository in the above diagram indicates a central server that could be local or remote which is directly connected to each of the programmer’s workstations.
Every programmer can update their workstations with the data present in the repository or can make changes to the commit in the repository. Every operation is performed directly on the repository.
Even though it seems pretty convenient to maintain a single repository, it has some major drawbacks. Some of them are:
It is not locally available; means you always need to be connected to a network to perform any action.
Since everything is centralized, in any case of the central server getting crashed or corrupted will result in losing the entire data of the project.
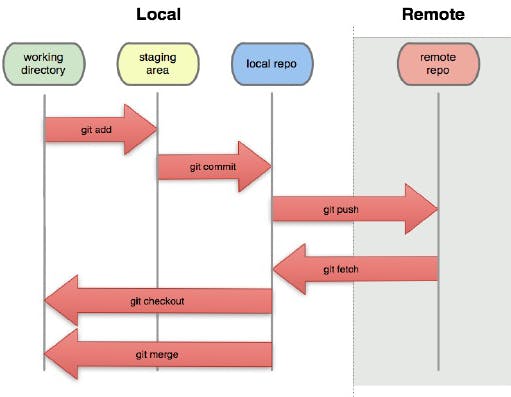
Distributed VCS
These systems do not necessarily rely on a central server to store all the versions of a project file.
In Distributed VCS, every contributor has a local copy or “clone” of the main repository i.e. everyone maintains a local repository of their own which contains all the files and metadata present in the main repository.
You will understand it better by referring to the diagram below:
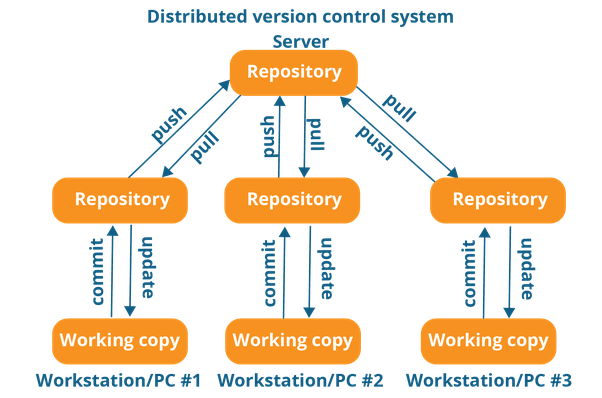
As you can see in the above diagram, every programmer maintains a local repository on its own, which is actually the copy or clone of the central repository on their hard drive. They can commit and update their local repository without any interference.
They can update their local repositories with new data from the central server by an operation called “pull” and affect changes to the main repository by an operation called “push” from their local repository.
The act of cloning an entire repository into your workstation to get a local repository gives you the following advantages:
All operations (except push & pull) are very fast because the tool only needs to access the hard drive, not a remote server. Hence, you do not always need an internet connection.
Committing new changesets can be done locally without manipulating the data on the main repository. Once you have a group of change-sets ready, you can push them all at once.
Since every contributor has a full copy of the project repository, they can share changes with one another if they want to get some feedback before affecting changes in the main repository.
If the central server gets crashed at any point in time, the lost data can be easily recovered from any one of the contributor’s local repositories.
To sum this up, in simple words - Source control, or version control is a way of tracking your flies' progress over time. It is usually saved in a series of snapshots and branches, which you can move back and forth between.
After knowing everything about source controls, it's time we take a dive into what is Git.
Git is basically a Distributed Version Control tool that supports distributed non-linear workflows by providing data assurance for developing quality software.
Now there might be a question in your mind – which asks why git?
Git is a source control software, similar to many others like Mercurial, Fossil, GNU Bazaar, etc. developed out there.
Git is the most popular.
Git provides lots of documentation and support.
Git provides lots of integration with other applications like GitHub, Bit bucket, Source tree, Heroku, etc.
Now moving further to the concept of GitHub.
In very simple words, we can say that GitHub is a website that provides different services to the user – for example, you can make wiki pages or conference pages, task management tools/activities, bug tracking, and hosting services for Git Repos (repositories).
Here are some facts about GitHub:
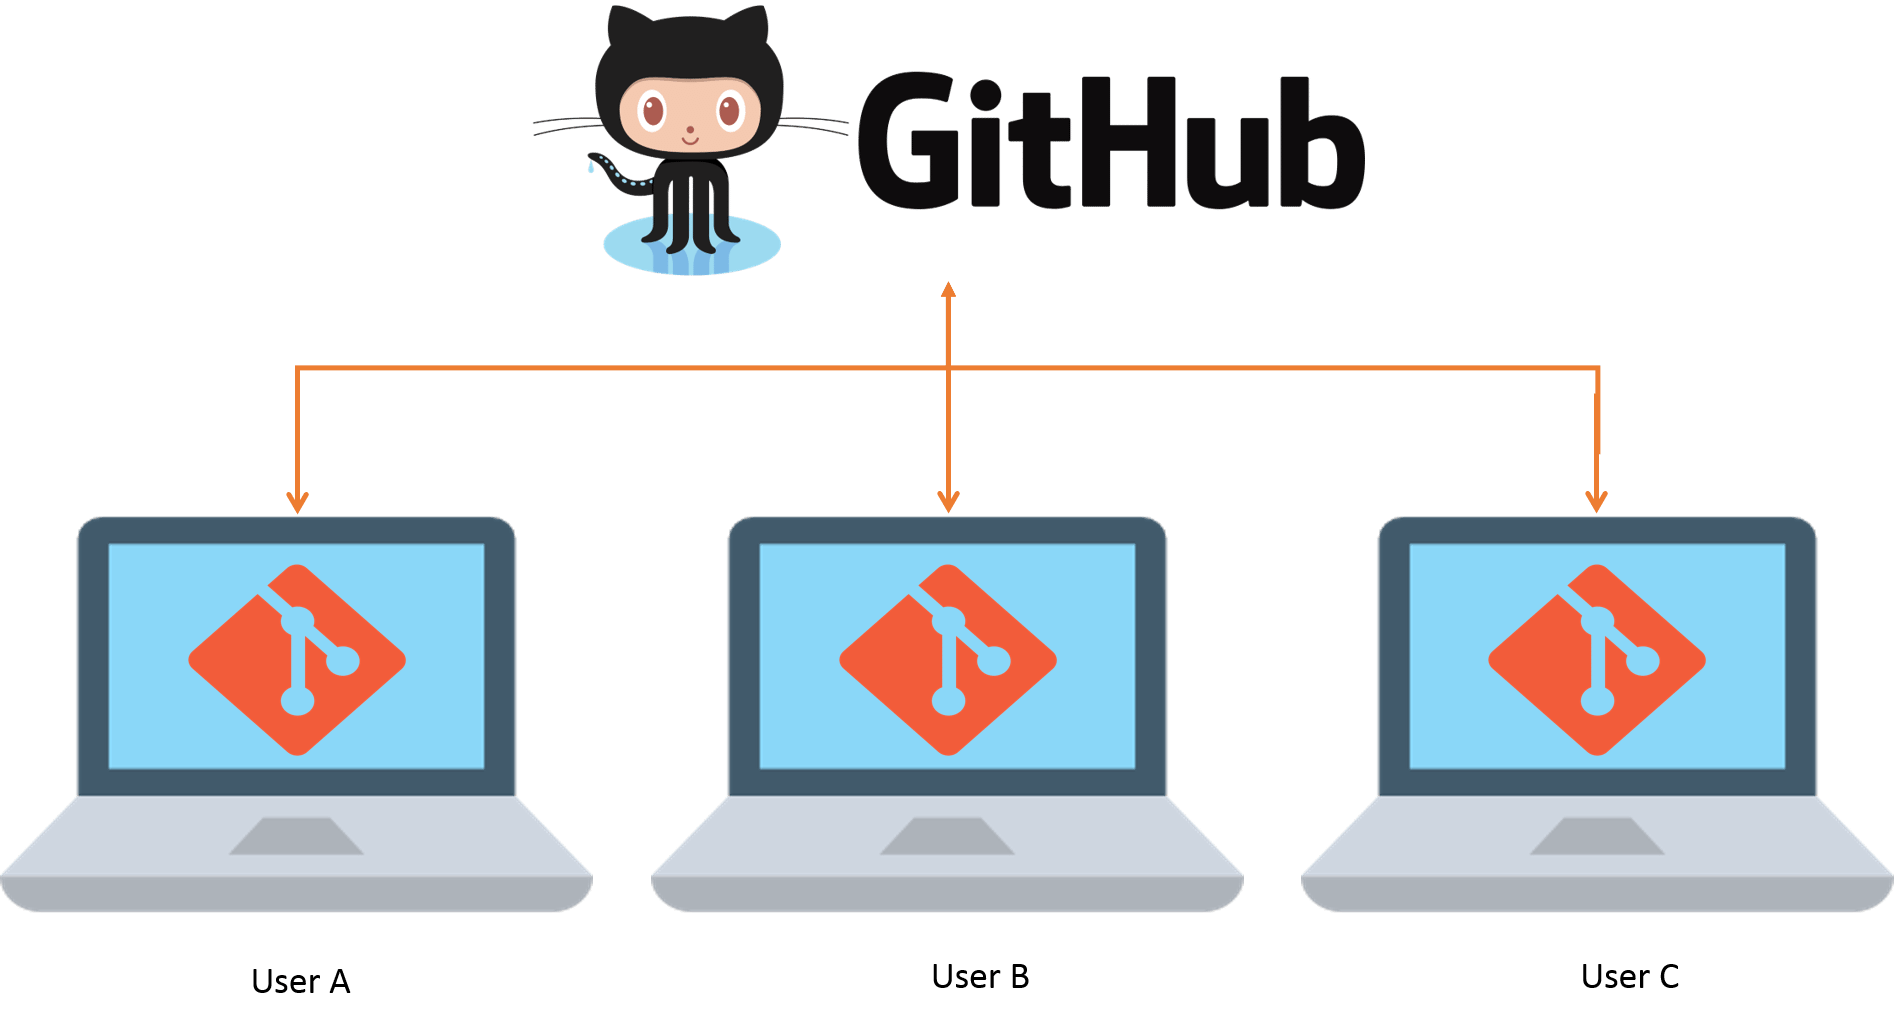
GitHub is an application allowing you to store remote repositories. You can interact with your GitHub repositories through a push/pull system on your local machine.
GitHub is primarily to allow other people to add to the project (ex. Open Source Projects).
GitHub allows more people than just yourself to see and interact with the repository and thus it’s the reason GitHub is known as Social Coding.
There is a common misconception in the mind of many folks, that both Git and GitHub are almost the same. But in actual they are like two poles of a magnet. Below mention is the difference between them.
GitHub is just a website or hosting service and on that particular service, you can create a number of hosting repositories. Whereas, Git is a tool, so everything happening like push and pull, versioning control, and creating the branches is happening through git.
GitHub is an application allowing you to store and interact with your repository on a remote server, as licensing collaborators i.e. a repository hosting service. Git is a source control software and allowing you to take snapshots and distribute your creations and modification over time i.e. a version control system.
To remember it, just think that if Git is the bones and flesh of the source control, GitHub gives you the platform to work with your repository easier.
Setting up the environment
Before you start working on git, you need to set up the environment to save your code of GitHub.
For this, you are supposed to complete the following requirements:
installing Git on your machine
creating an account at GitHub
creating a work-space on your machine
Installing Git on your machine
Git installation is different on each operating system. Check out Git’s official site to see which way is right for you.

Once your Git is installed, you are supposed to create a GitHub account and configure it on your machine.
Creating an account on GitHub
To create an account, go to the GitHub website and fill out the main form.
Before you create your repository, set up your GitHub email and user name in your machine.
Setting up our system with our GitHub data
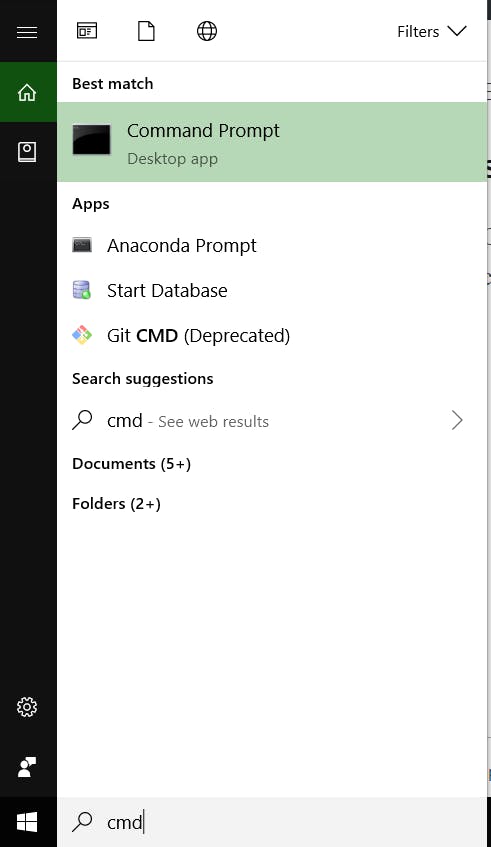
Open up your Terminal. In Windows, you have to open the start menu and type cmd. Then click enter.
With that, you have to execute the following shell command in the cmd prompt:
git config --global user.name "our_GitHub_user_name"
Now put in your GitHub email address:
git config --global "our_GitHub_user_email"
Setting up your GitHub access key
Whenever you access a repository via shell, you need to have access permission. This is granted when you sign in to your GitHub account. But, every time you send something to your repository (repo), you must pass your credentials.
To avoid this, use an SSH key. This is an access key that GitHub exchanges with the one configured on your machine.
To create this key, follow the process outlined in the GitHub documentation.
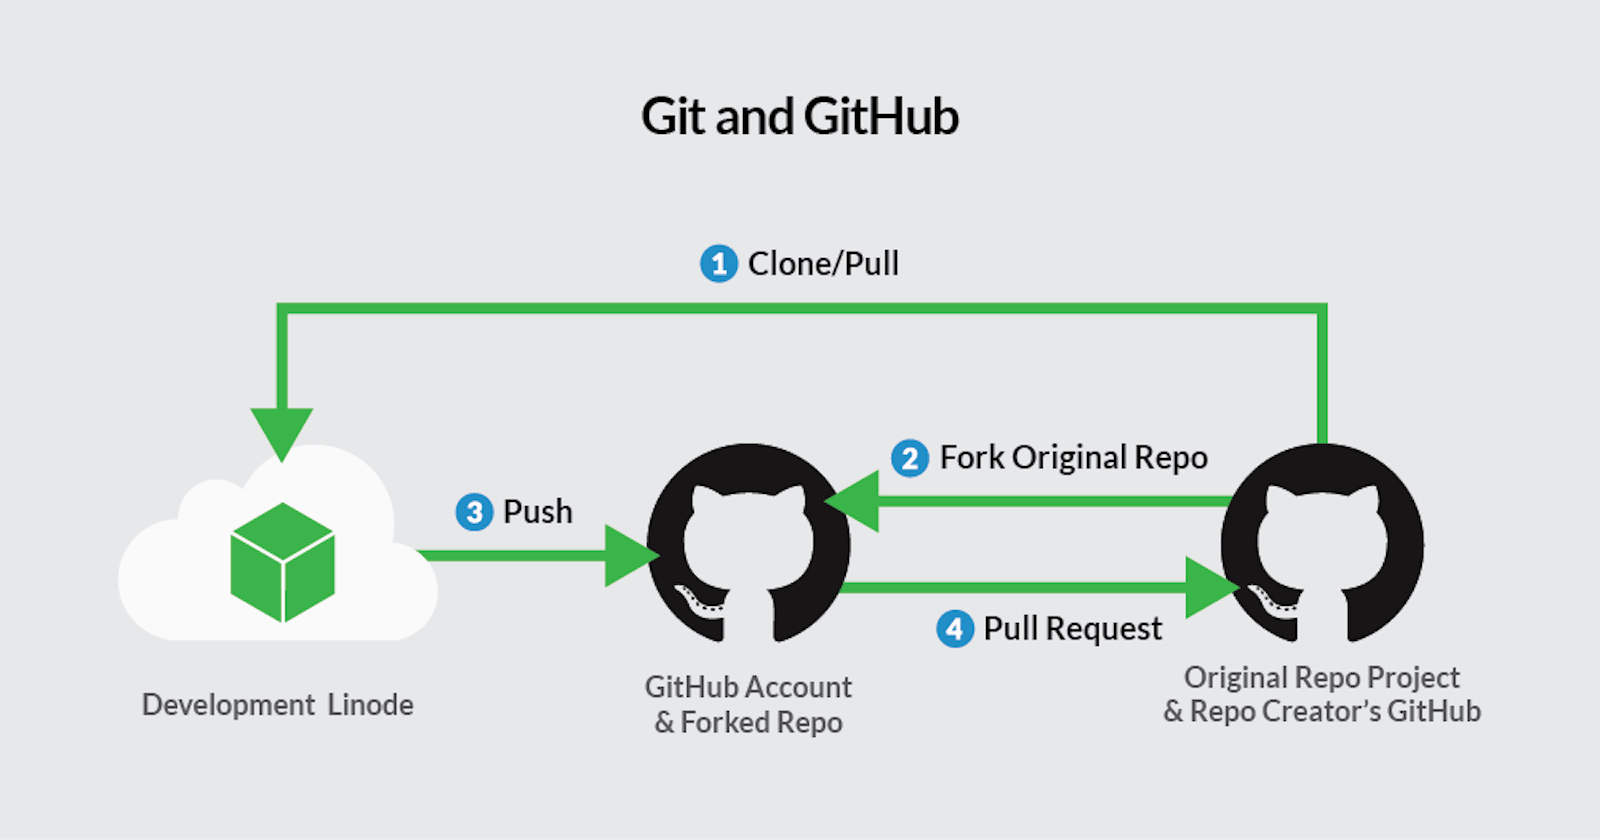
The Git workflow
In simple words, Git Workflow is whenever you create a project to study a concept, you’ll create a repository, clone it in your machine, work on it using branches, and make small commits to send to GitHub.
In order to learn more about the git workflow in detail, please click here.
So let's get started with some practical implementations.
Creating a new project
Before beginning the project, I have a question for you! Are you aware of the term repository? If yes, please skip this paragraph and head to the next most paragraph of this column. Else, stay tuned to this sub-section itself.
Repositories: commonly called repos, store history and full control of the project. It stores all the changes and progress of the project over time. They can either be hosted locally or on a shared server, such as GitHub. Most repos are stored on GitHub, while the core contributors make copies of the repos on their machine and update the repositories using the push/pull system. Any repository stored somewhere other than locally is called a remote repository.
Please don’t get confused between the term repository and directory. A directory is a location in a file system, like /bin. A repository is typically a bunch of version-controlled files.
Let’s get back to your GitHub page and click on the plus(+) icon at the top of the page.
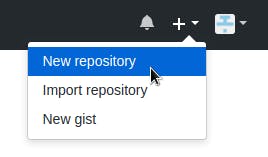
Click on New repository.
Let’s say you are creating a project to study python, so name your repository learning-python. The name of the repository can be anything according to choice.
The description of the project is optional. But I think it’s important to enter some helpful text there, as it will identify the scope of your project. If other people want to help you, they can understand your project briefly through the description.
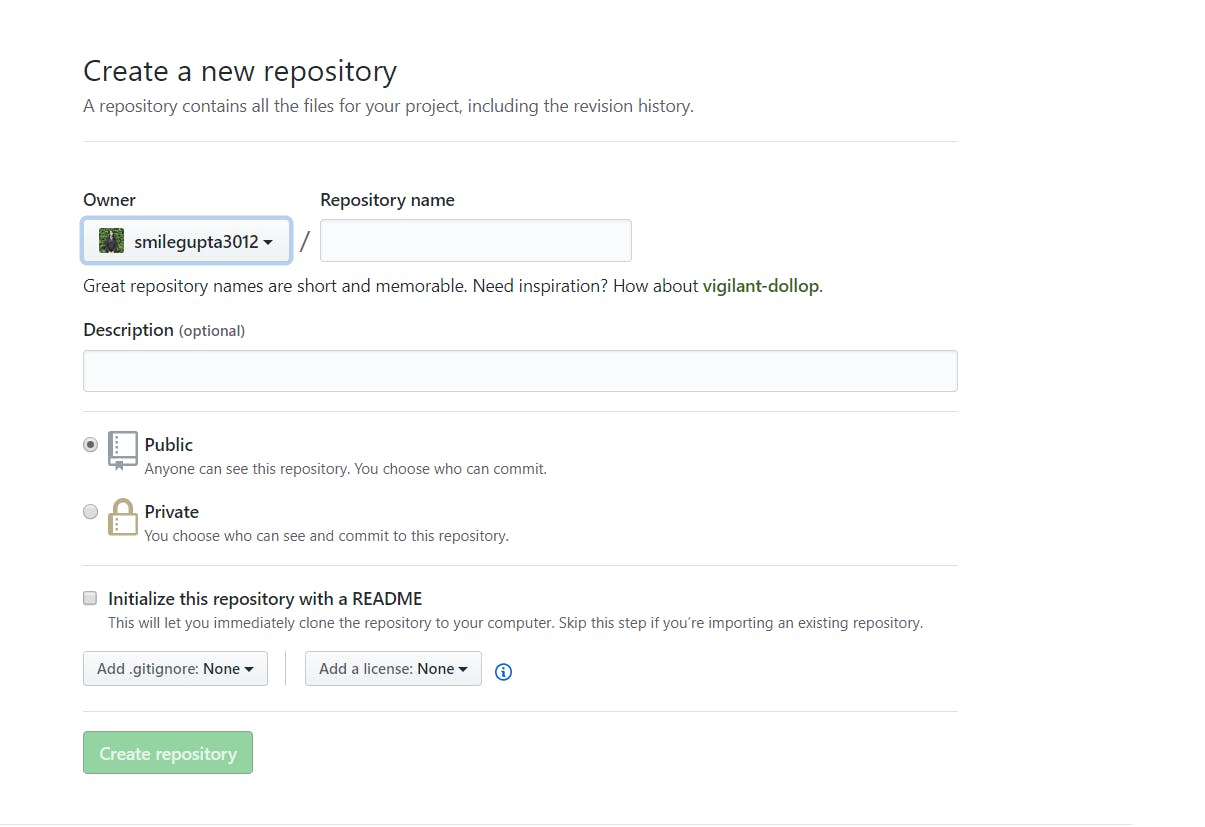
You should make a README file as well, and define the type of license that you will use in the project.
The README file is a more complete description of your project, so it’s a good idea to put some helpful information in there.
Although the license is optional, it’s good practice to define it. The license will say what other people can do with your code.
Create your Work-space
Once you’ve created the repository, you can clone it on your machine. But before that, you need to create a folder where you will clone all future repositories you work on.
Work-space can be created using two ways:
(i) Using Git-Bash Option
(ii) Using Terminal (Command Prompt)
Let's first discuss the "Git-Bash Option" method. This technique is very simple. What you need to do is that:-
1) Create a new folder and rename it according to your choice.
2) Open the folder and press the right click of the mouse.
3) Select Git Bash Here from the drop-down menu.
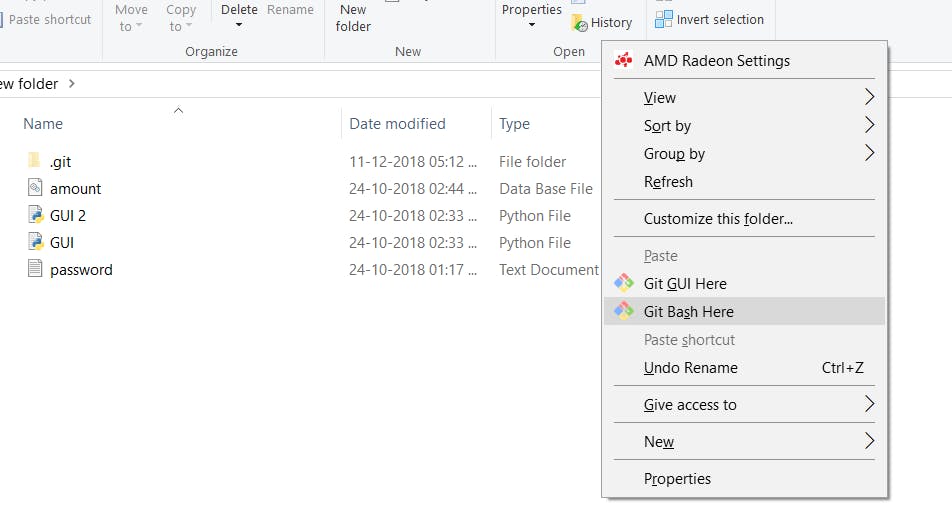
By doing so, your workplace has been created.
Moving further to the terminal method. For this approach follow the subsequent steps:-
1) Open your command prompt.
2) If you aren’t on this path, use the command:
cd home
3) Run the command mkdir folder_name to create the workspace. For example:
mkdir workspace
That’s it! Now you have the default folder for your projects, and you can clone your repositories in there.
Creating your First Repository and Pushing project to GitHub
Do you know! What exactly pushing means in Git? In very laymen's terms, Push is check-in i.e. Checking in the code or a folder on GitHub.
There are two ways of starting fresh with Git and GitHub, one is using init command and the other is using cloning. Both the ways are mentioned one by one below.
For Pushing a project to GitHub, you exactly need to perform the seven steps
1) Initializing
2) Adding the remote address
3) Checking the Status
4) Adding the desired files or folders
5) Checking the status once again before final commit
6) Committing
7) Pushing to the origin master
Let's discuss each of the segments, one by one.
Initializing
In order to do that, we use the command git init. Please refer to the below screenshot.

git init creates an empty Git repository or re-initializes an existing one. It basically creates a .git directory with subdirectories and template files. Running a git init in an existing repository will not overwrite things that are already there. It rather picks up the newly added templates.
Now that my repository is initialized, let me create some files in the directory/repository. For e.g. I have created three namely GUI.py, amount.db, and password.txt.
Git status
The git status command lists all the modified files which are ready to be added to the local repository.
Let us type in the command git status to see what happens:
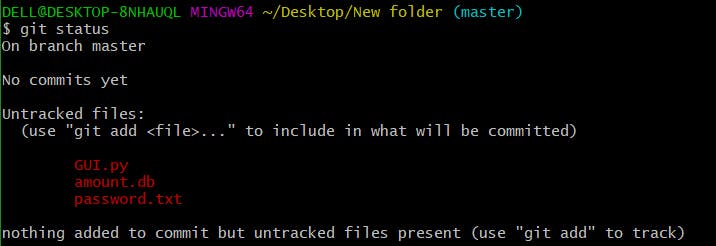
This shows that I have three files which are not added to the index yet. This means I cannot commit changes with these files unless I have added them explicitly to the index. Please see that the red color in the status shows that, the files are present in the folder but not yet added to the staging area.
Adding the remote address
This step is very vital while working with Git and GitHub. The significance of this step is that it helps to tell my Git Bash, on which repository you are working upon and to which account of the GitHub this repo is associated. The command is as follows:-
git remote add origin https"//github.com/<user_id>/<repo_name>

Add the desired files or folders
This command updates the index using the current content found in the working tree and then prepares the content in the staging area for the next commit.
Thus, after making changes to the working tree, and before running the commit command, you must use the add command to add any new or modified files to the index. For that, use the commands below:
git add <directory>

or

git add <file>
Let me demonstrate the git add for you so that you can understand it better.

I have created three files. Let us add the files using the command git add . . This command will add all the files to the index which are in the directory but not updated in the index yet.
Let's check the status once again, to verify whether the files are added correctly or not.
I am performing the git status command again and let's see what happens.
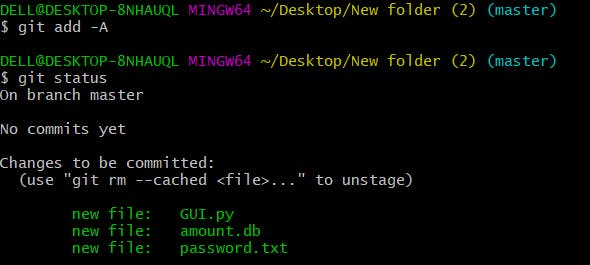
This shows that I have three files that are added to the index. Please see that the green color in the status shows that, the files are present in the folder and are too added on the staging area and are ready to commit.
Now, let's commit it.
Commit
It refers to recording snapshots of the repository at a given time. Committed snapshots will never change unless done explicitly. Let me explain how commit works with the diagram below:
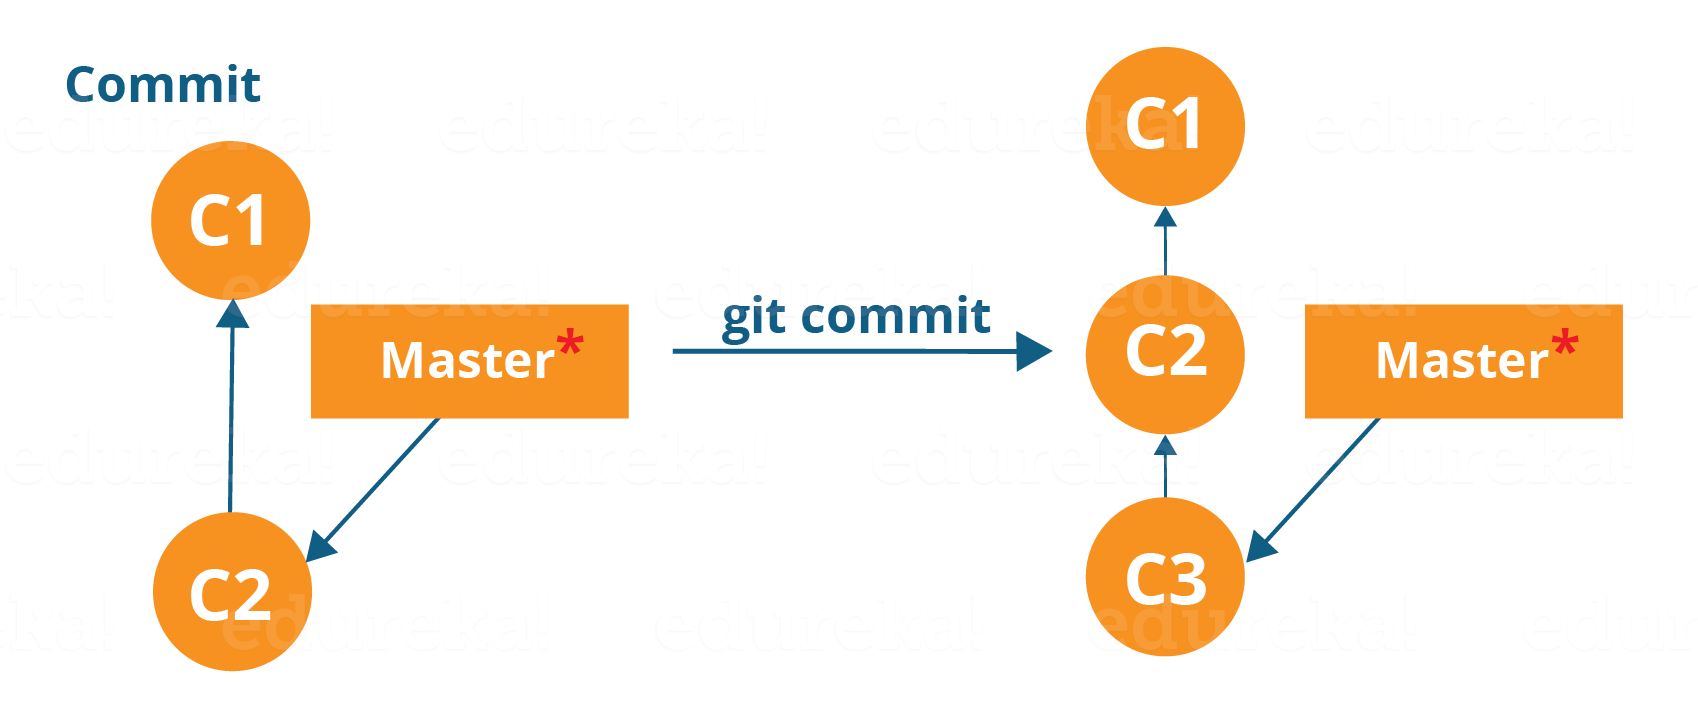
Here, C1 is the initial commit, i.e. the snapshot of the first change from which another snapshot is created with changes named C2. Note that the master points to the latest commit.
Now, when I commit again, another snapshot C3 is created and now the master points to C3 instead of C2.
Git aims to keep commits as lightweight as possible. So, it doesn’t blindly copy the entire directory every time you commit; it includes commit as a set of changes, or “delta” from one version of the repository to the other. In easy words, it only copies the changes made in the repository.
You can commit by using the command below:
git commit

or

git commit -a // here -a refers to all

or

git commit -a -m "Message of your choice" // here -m refers to the message
Let's try this out!

As you can see above, the git commit command has committed the changes in the three files in the local repository.
Also, there is another term, called Commit Hash, related to the Commit command at GitHub. Commit Hash is simply a unique id generated by GitHub in order to track the no of commits performed by particular users on a particular project.
Pushing to the origin master
Now, since the files are committed, now you need to push them to GitHub. Push is simply like check-in to the website. The use of git push is to publish your local changes to a central repository. After you’ve accumulated several local commits and are ready to share them with the rest of the team, you can then push them to the central repository by using the following command:
git push origin master
Let me demonstrate it to you.
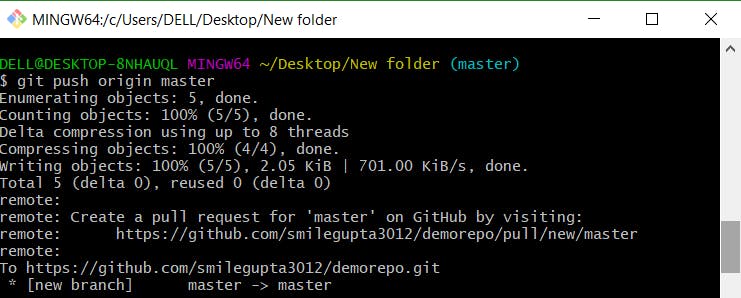
Bravo! You did it. :) Your first repo is finally made.
WATCH OUT! There a chance, that when you will be working with your Git-Bash terminal, there is a chance you may get switched into VIM. Press colon (:) and then Q to exit.
And yes! one more thing shortcuts like cut/copy/paste won't work in the command line. You need to use shift and insert along with it. To exemplify, for example, you need to paste the path of any folder. Simply press Ctrl + V + Shift + Insert.
Git Cloning
Do you know! What exactly is cloning in Git? How to perform cloning in git? Are Cloning and Forking are one of the same things? Answers to these questions are written downside.
Cloning a repository means, creating a local copy of the code provided by the developer on your machine. A Clone is where you have proper duplication, and separation between, two versions of a repository. When one repository is amended, the new content must be actively copied to the other repository using a push command. And changes in the other repository are fetched.
When you are Forking a repository you are creating a copy of the repository under the GitHub Id. Any changes made to the original repository will be reflected back to your forked repository. However, if you make any changes to your forked repository you will have to explicitly create a pull request to the original repository. When your pull request is approved by the administrator of the original repository, then your changes will be merged with the existing original code-base. Until then, your changes will be reflected only in the copy you forked.
Let's demonstrate it.
To exemplify, you found a Selenium Java Course, on GitHub. You want the exact same code, in your local machine. To download each and every file remotely, you can simply clone the entire repository. The syntax for cloning is
git clone https://github.com/<user-name>/<repo-name>
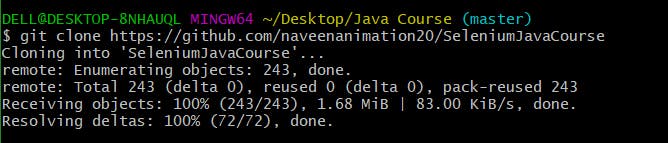
Illustration with a pre-existing Repository
Another way, of starting fresh on git is making a repository on GitHub beforehand and then downloading it i.e. cloning it to your machine.
So, let's go back to GitHub, and create a new repository. I am going to call this one say Rainbow Song.
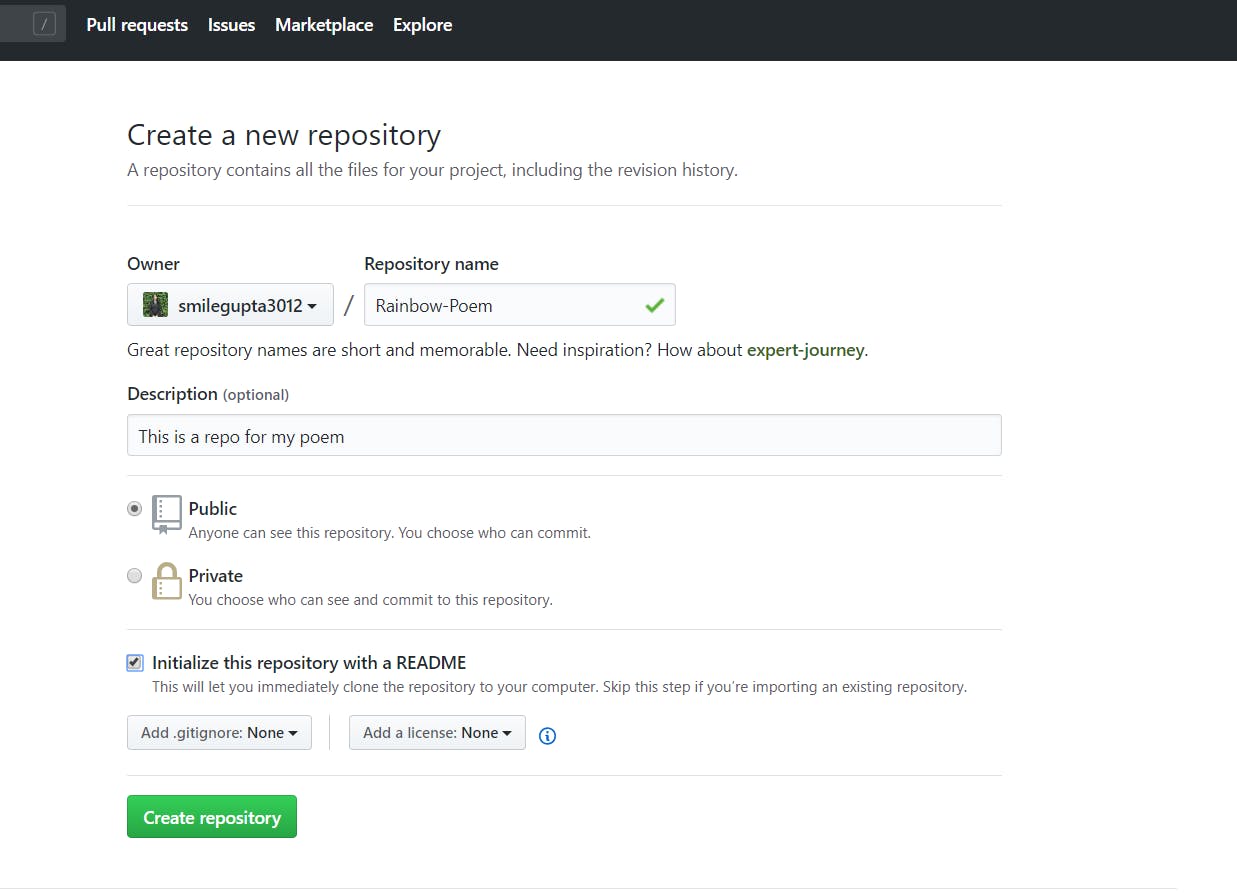
Here, one thing I am going to do here, that is actually important is that I am checking the box of README. The reason why I am checking the box is, it will be lot easier to work with, if a repository on GitHub has a file associated with it already.
So here are the steps associated with it.
1) Cloning the repository to the system
2) Finding the cloned folder
3) Doing some changes in the readme file
4) Checking the status
5) Committing the changes
6) Pushing the changes
Let's discuss each of the segments, one by one.
Cloning the repository to the system
As already explained, the clone is an act of taking the repository from a server like GitHub and downloading a copy and then push it back or pull it from the server if the changes are not there on your system.
The syntax for the cloning will be the same, as mentioned below.
git clone https://github.com/smilegupta3012/Rainbow-Song.git
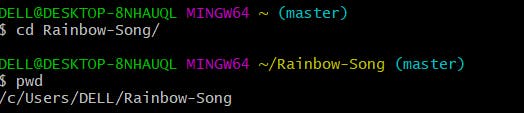
Finding the cloned folder and doing some changes in the readme file
Now in the bash terminal, I will enter cd Rainbow-Song/ and then pwd to find its location. Once when found the folder, modify the contents of the README file, by taking the aid of any text editor of your choice.
Checking the status
Now let's check the status of the folder or the workspace.
Command will be the same to check status i.e. git status
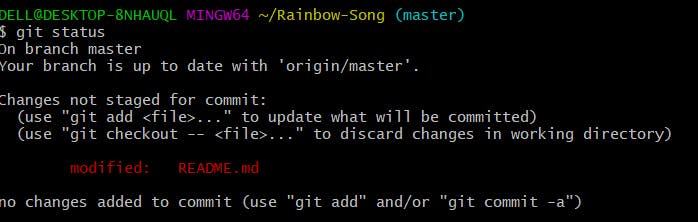
The above spinet shows the text in reading, which means the file has been modified but is yet to commit.
Now, let's commit it and jot down the changes.
Committing the changes
To commit the changes, I will use the same syntax for committing i.e.
git commit -a -m " "

The above snippet shows the changes have been committed successfully. In order to view the changes on the GitHub website, you need to push it to the same.
Pushing the changes
Pushing, in this case, is slightly different, first of all, you need to set up a remote. This remote refers to the remote repository (duplicate instance of the repository, that lives somewhere else of the remote server) which had been set before using the pull/clone command.
So the command for pushing is
git remote or git remote -v


After adding remote, use the command git push origin master which I have already specified above out there.
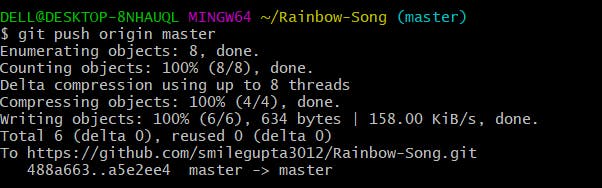
And you did it. :)
These changes will be reflected on the GitHub website.
Please see that here I just modified the README file and updated it, by using the same process you can add n number of files in it according to your requirement.
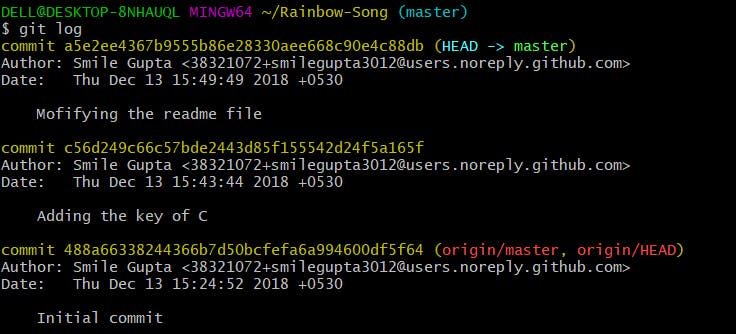
git log command: Command log allows you to see locally the history of your git commits.
Conclusion
Via this article, I am sure you have had learned to create a new project on GitHub. This will not only help you get to know the command line, but Git also commands, and GitHub. But will definitely aid you in creating a nice and better profile of yours for jobs and interviews.
One tip from my side, practicing and playing with it on daily basics will help in gaining a better insight and understanding of the concept. Plus, your knowledge and skills on the Terminal (command line) will raise for free.
Come back here and follow this step-by-step guide every time you forget something!