


Introduction
The SOLID principles are a set of design principles that help guide software developers in creating code that is maintainable, modular, and flexible. These principles were introduced by Robert C. Martin (also known as Uncle Bob) and are widely used in object-oriented programming. Each letter in SOLID represents a specific principle.
Let's try to understand the SOLID principles with a fun analogy using the Avengers:
Single Responsibility Principle (SRP): Just like how each Avenger has a specific role to play, each module or class in your code should have a single responsibility. For example, Iron Man's responsibility is to provide aerial support and firepower, while Captain America's responsibility is to lead and inspire the team. Similarly, your code should be designed to have each module or class responsible for a single task.
Open/Closed Principle (OCP): The Avengers team is open to new members and can expand to include more superheroes. The OCP encourages code to be open for extension but closed for modification. In the Avengers context, this means the team can be extended by adding new members without changing the existing members' roles or dynamics. Similarly, in software development, code should be designed in a way that allows for easy extension or addition of new functionality without modifying existing code.
Liskov Substitution Principle (LSP): The LSP states that a subclass should be able to be used in place of its parent class without affecting the behaviour of the program. This is like how the different versions of Iron Man's suit are interchangeable. You can swap out one version for another and still have the same basic functionality. Similarly, when designing your code, you should ensure that any subclasses or derived classes can be used in place of their parent classes without any unexpected behaviour.
Interface Segregation Principle (ISP): Each Avenger has their own unique set of abilities and responsibilities. They don't rely on abilities they don't possess or need. This reflects the Interface Segregation Principle, which states that clients should not be forced to depend on interfaces they do not use. In software development, this means that interfaces should be specific to the needs of the clients, avoiding unnecessary dependencies and providing only the methods required for each client.
Dependency Inversion Principle (DIP): The DIP states that higher-level modules should not depend on lower-level modules, but instead both should depend on abstractions. This is like how the Avengers work together as a team, with each member contributing their unique skills and abilities to achieve a common goal. Similarly, when designing your code, you should strive to create abstractions that allow your modules to work together without creating tight dependencies between them.
By following these SOLID principles, developers can create code that is easier to understand, maintain, and extend. These principles help improve code quality, modularity, and flexibility, leading to more robust and scalable software applications.
Single Responsibility Principle(SRP):
The SRP means that a function or module should only be responsible for doing one thing. This makes the code easier to understand, test, and maintain because each function or module has a clear purpose and can be easily reused in other parts of your code.
Here's an example to illustrate this principle. Let's say you have a function that takes a list of numbers and returns the sum of those numbers:
function sum(numbers) {
  let total = 0;
  for (let i = 0; i < numbers.length; i++) {
    total += numbers[i];
  }
  return total;
}
This function has a single responsibility: to calculate the sum of a list of numbers. It doesn't do anything else, like printing the result to the console or formatting the numbers in a specific way. By keeping this function focused on its single responsibility, it's easier to understand, test, and maintain.
On the other hand, if you had a function that both calculated the sum of a list of numbers and printed the result to the console, it would violate the SRP. This function would be harder to test because you'd have to capture the output from the console and check it against an expected value. It would also be harder to reuse this function in other parts of your code because you might not always want to print the result to the console.
// This function violates the SRP by doing two things: calculating the sum and printing the result
function sumAndPrint(numbers) {
  let total = 0;
  for (let i = 0; i < numbers.length; i++) {
    total += numbers[i];
  }
  console.log(`The sum of the numbers is: ${total}`);
}
Let us look at a few more examples:
Imagine you are building a blogging platform where users can create and publish blog posts. In this example, we can demonstrate SRP by separating the concerns related to user authentication and blog post management.
Here's an example of the implementation:
// UserService handles user authentication and related functionality
class UserService {
  login(username, password) {
    // User authentication logic
    console.log(`User '${username}' logged in`);
    // ...
  }

  logout() {
    // User logout logic
    console.log('User logged out');
    // ...
  }

  // Other user-related functionality...
}

// BlogPostService handles blog post management
class BlogPostService {
  createPost(title, content) {
    // Blog post creation logic
    console.log(`Blog post '${title}' created`);
    // ...
  }

  deletePost(postId) {
    // Blog post deletion logic
    console.log(`Blog post with ID '${postId}' deleted`);
    // ...
  }

  // Other blog post-related functionality...
}

// Usage
const userService = new UserService();
userService.login('john123', 'password'); // Output: User 'john123' logged in

const blogPostService = new BlogPostService();
blogPostService.createPost('My Blog Post', 'This is my first blog post'); // Output: Blog post 'My Blog Post' created

userService.logout(); // Output: User logged out
In this example, we have two separate classes: UserService and BlogPostService, each responsible for a specific set of functionality.
The UserService handles user authentication, login, logout, and other user-related functionality. It encapsulates the logic related to user management.
The BlogPostService focuses on blog post management, including creating and deleting blog posts. It encapsulates the logic specific to blog posts.
By separating these concerns into distinct classes, we adhere to the Single Responsibility Principle. The UserService is responsible for user-related functionality, and the BlogPostService is responsible for blog post-related functionality. Each class has a single responsibility, making the code easier to understand, maintain, and extend.
Imagine you are building a file management system where users can upload, download, and delete files. In this example, we can demonstrate SRP by separating the concerns related to file handling.
Here's an example of the implementation:
// FileUploader handles file uploading functionality
class FileUploader {
  upload(file) {
    // File uploading logic
    console.log(`Uploading file '${file.name}'`);
    // ...
  }

  // Other file upload-related functionality...
}

// FileDownloader handles file downloading functionality
class FileDownloader {
  download(file) {
    // File downloading logic
    console.log(`Downloading file '${file.name}'`);
    // ...
  }

  // Other file download-related functionality...
}

// FileDeleter handles file deletion functionality
class FileDeleter {
  delete(file) {
    // File deletion logic
    console.log(`Deleting file '${file.name}'`);
    // ...
  }

  // Other file deletion-related functionality...
}

// Usage
const fileUploader = new FileUploader();
const fileDownloader = new FileDownloader();
const fileDeleter = new FileDeleter();

const file = {
  name: 'document.pdf',
  // Other file properties...
};

fileUploader.upload(file); // Output: Uploading file 'document.pdf'
fileDownloader.download(file); // Output: Downloading file 'document.pdf'
fileDeleter.delete(file); // Output: Deleting file 'document.pdf'
In this example, we have three separate classes: FileUploader, FileDownloader, and FileDeleter, each responsible for a specific aspect of file management.
The FileUploader class handles the file uploading functionality, encapsulating the logic related to uploading files.
The FileDownloader class focuses on file downloading, encapsulating the logic specific to downloading files.
The FileDeleter class is responsible for file deletion, encapsulating the logic related to deleting files.
It's important to note that in a real-life file management system, there might be additional classes or components involved, such as file storage management, metadata handling, or access control. The key is to identify the distinct responsibilities and create separate classes to handle each responsibility, promoting a more maintainable and scalable codebase.
Here are a few real-life situations where you can use SRP:
Form Validation: When implementing form validation in a web application, you can adhere to the SRP by separating the validation logic into a dedicated module or class. This module can handle input validation, error messaging, and related functionality without being responsible for other unrelated tasks such as form submission or data processing.
User Authentication: In a user authentication system, you can apply the SRP by separating the responsibilities of user management and authentication. One module can handle user registration, password resets, and other user-related operations, while another module can focus solely on the authentication process, such as validating credentials and issuing authentication tokens.
Logging: When implementing logging functionality in an application, you can follow the SRP by creating a dedicated logging module that is responsible only for capturing and recording log messages. This module can abstract the underlying logging mechanism (e.g., writing to a file, or sending logs to a remote server) and allow other parts of the application to use it without getting involved in the logging details.
File Upload and Processing: In scenarios where file upload and processing are required, you can apply the SRP by separating the responsibilities of handling file uploads, file storage, and file processing. Each of these tasks can be implemented in separate modules, ensuring that each module has a single responsibility and can be modified or extended independently.
API Design: When designing APIs, each endpoint or function should have a single responsibility. For example, an API endpoint responsible for fetching user data should only be responsible for fetching user data and not for handling other unrelated tasks. By adhering to the SRP, you can promote a clear and concise API design that is easy to understand and use.
Open/Closed Principle (OCP):
The Open/Closed Principle is a software design principle that states that software entities (classes, modules, functions, etc.) should be open for extension but closed for modification. In other words, you should be able to add new functionality to a software entity without changing its existing code.
In JavaScript, this principle can be applied in many ways here are one example:
Suppose you have a function that formats a string for display on a web page. The function takes a string as input and returns a formatted string that's ready to be displayed:
function formatForDisplay(str) {
  return str.toUpperCase();
}
Now, suppose you want to add some new formatting options to this function. Instead of modifying the existing code, you can create a new function that extends the functionality of the original function:
function formatForDisplay(str, formatter) {
  return formatter(str);
}

function upperCaseFormatter(str) {
  return str.toUpperCase();
}

function lowerCaseFormatter(str) {
  return str.toLowerCase();
}
Here, we've created two new functions that take a string as input and return a formatted string. These functions can be passed as arguments to the formatForDisplay function, allowing it to be extended with new formatting options without modifying its existing code.
This is an example of the OCP in action: the formatForDisplay function is open for the extension because new formatting options can be added without changing its existing code. At the same time, it's closed for modification, because the original code doesn't need to be changed to add new functionality.
Let us look at a few more examples:
Imagine you have a messaging application that supports various messaging platforms such as SMS, Email, and WhatsApp. You want to implement a notification system that sends notifications to users when they receive a new message. Each messaging platform requires a different notification method.
Here's an example of the implementation:
class Notification {
  sendNotification(message) {
    // Common notification sending logic
    console.log(`Sending notification: ${message}`);
  }
}

class SMSNotification extends Notification {
  sendNotification(message) {
    // Specific SMS notification sending logic
    console.log(`Sending SMS notification: ${message}`);
  }
}

class EmailNotification extends Notification {
  sendNotification(message) {
    // Specific email notification sending logic
    console.log(`Sending email notification: ${message}`);
  }
}

class WhatsAppNotification extends Notification {
  sendNotification(message) {
    // Specific WhatsApp notification sending logic
    console.log(`Sending WhatsApp notification: ${message}`);
  }
}

class NotificationService {
  constructor(notification) {
    this.notification = notification;
  }

  sendNewMessageNotification(message) {
    this.notification.sendNotification(message);
  }
}

const smsNotification = new SMSNotification();
const emailNotification = new EmailNotification();
const whatsappNotification = new WhatsAppNotification();

const notificationService = new NotificationService(smsNotification);
notificationService.sendNewMessageNotification("New message received");
// Output: Sending SMS notification: New message received

notificationService.notification = emailNotification;
notificationService.sendNewMessageNotification("New message received");
// Output: Sending email notification: New message received

notificationService.notification = whatsappNotification;
notificationService.sendNewMessageNotification("New message received");
// Output: Sending WhatsApp notification: New message received
In this example, the Notification class is the base class that defines the common behavior for sending notifications. It has a method called sendNotification that takes a message as a parameter and logs the notification.
The SMSNotification, EmailNotification, and WhatsAppNotification classes are derived classes that inherit from Notification. They provide the specific implementation for sending notifications via SMS, email, and WhatsApp, respectively.
The NotificationService class is responsible for sending new message notifications. It has a constructor that takes a notification object (which can be an instance of any class derived from Notification) and a method called sendNewMessageNotification that calls the sendNotification method on the notification object.
By adhering to the Open/Closed Principle, we can easily add new messaging platforms (e.g., Facebook Messenger) without modifying the existing code. We simply need to create a new derived class from Notification (e.g., FacebookMessengerNotification) and pass an instance of it to the NotificationService.
This design allows for the extension of the application's functionality without the need to modify existing code. It is open for adding new messaging platforms but closed for modification, promoting modularity and maintaining the integrity of the existing codebase.
- Imagine you have a web application that generates reports in various formats such as PDF, CSV, and Excel. You want to design the application in a way that allows for the easy addition of new report formats without modifying the existing code.
Here's an example of the implementation:
// Configuration file
const reportFormats = {
  pdf: {
    generate: () => {
      console.log('Generating PDF report...');
      // PDF report generation logic
    },
  },
  csv: {
    generate: () => {
      console.log('Generating CSV report...');
      // CSV report generation logic
    },
  },
  excel: {
    generate: () => {
      console.log('Generating Excel report...');
      // Excel report generation logic
    },
  },
  // Add new report formats here...
};

// ReportGenerator class
class ReportGenerator {
  constructor(reportFormat) {
    this.reportFormat = reportFormat;
  }

  generateReport() {
    this.reportFormat.generate();
  }
}

// Usage
const pdfReportGenerator = new ReportGenerator(reportFormats.pdf);
pdfReportGenerator.generateReport(); // Output: Generating PDF report...

const csvReportGenerator = new ReportGenerator(reportFormats.csv);
csvReportGenerator.generateReport(); // Output: Generating CSV report...

const excelReportGenerator = new ReportGenerator(reportFormats.excel);
excelReportGenerator.generateReport(); // Output: Generating Excel report...
In this example, we have a configuration file that defines different report formats (pdf, csv, excel). Each report format is represented as an object with a generate method that performs the specific report generation logic.
The ReportGenerator class takes a reportFormat object as a dependency in its constructor. It has a generateReport method that delegates the report generation to the generate method of the provided reportFormat object.
By utilizing configuration and dependency injection, we can easily extend the application to support new report formats. To add a new report format, we simply need to define a new object in the reportFormats configuration and provide its corresponding generate method.
For example, if we want to add a new report format called json, we can extend the reportFormats configuration:
const reportFormats = {
  // Existing report formats...
  json: {
    generate: () => {
      console.log('Generating JSON report...');
      // JSON report generation logic
    },
  },
};
Then, we can create a new ReportGenerator instance with the json report format:
const jsonReportGenerator = new ReportGenerator(reportFormats.json);
jsonReportGenerator.generateReport(); // Output: Generating JSON report...
This approach adheres to the OCP by allowing the addition of new report formats without modifying the existing ReportGenerator class. It promotes modularity, maintainability, and the flexibility to extend the application's functionality.
Here are a few real-life situations where you can use OCP:
Theming and Styling: In frontend development, theming and styling are important aspects. By following the OCP, you can design your codebase to allow for easy customization of the application's look and feel. By using CSS classes or configuration options, you can enable users or developers to change the styling without modifying the core code.
API Integrations: When integrating with external APIs or services, the OCP can help you build flexible and adaptable code. By designing your code to be open for extension, you can easily handle changes in the API specifications or support new versions of the API without modifying the existing code. This can involve using adapter patterns, abstracting API interactions into separate modules, or utilizing configuration-based approaches.
Designing UI Components: In frontend development, UI components play a crucial role. By designing your components to be open for extension, you can allow customization of their appearance, behaviour, or functionality without modifying the core component code. This can be achieved through the use of props, event handlers, or composition techniques.
The Liskov Substitution Principle
The Liskov Substitution Principle (LSP) focuses on the relationship between a base class and its derived classes. The principle states:
"Functions that use pointers or references to a base class must be able to use objects of any derived class without knowing it."
In simpler terms, if a class (let's call it BaseClass) is used as a reference type, then any instance of a class derived from BaseClass (let's call it DerivedClass) should be able to be substituted in the code without causing issues or unexpected behaviour.
To adhere to the LSP, there are a few guidelines to follow:
Subtype Requirement: The derived class should meet the contract specified by the base class. This means that any methods or properties defined in the base class should be implemented in the derived class without altering their behaviour or breaking any preconditions or postconditions.
Behavioural Compatibility: The derived class should behave in a manner consistent with the base class. This means that any assumptions made about the base class should hold for the derived class as well. The derived class should not introduce new exceptions, modify existing behaviours, or violate any expected invariants.
Method Preconditions and Postconditions: The preconditions (requirements for the input) and postconditions (expected results) of methods in the base class should remain valid in the derived class. The derived class should not impose stronger preconditions or weaken postconditions compared to the base class.
By following the Liskov Substitution Principle, you ensure that derived classes can be used seamlessly in place of their base classes. This promotes code reusability, extensibility, and easier maintenance. It also helps prevent bugs and unexpected behaviour that can arise when code relies on specific implementations rather than abstractions.
For example: Imagine you have an application that handles orders and payments. You have a base class called PaymentProcessor, which has a method called processPayment is responsible for processing payments. It serves as an abstraction for different payment methods.
Now, let's say you have two derived classes: CreditCardPaymentProcessor and PaypalPaymentProcessor, representing specific payment processors for credit cards and PayPal, respectively. Both derived classes inherit from the PaymentProcessor base class.
Here's an example of the implementation:
class PaymentProcessor {
  processPayment(amount) {
    // Common payment processing logic
    console.log(`Processing payment for $${amount}`);
  }
}

class CreditCardPaymentProcessor extends PaymentProcessor {
  processPayment(amount) {
    // Credit card-specific payment processing logic
    console.log(`Processing credit card payment for $${amount}`);
  }
}

class PaypalPaymentProcessor extends PaymentProcessor {
  processPayment(amount) {
    // PayPal-specific payment processing logic
    console.log(`Processing PayPal payment for $${amount}`);
  }
}

function makePayment(paymentProcessor, amount) {
  paymentProcessor.processPayment(amount);
}

const creditCardProcessor = new CreditCardPaymentProcessor();
const paypalProcessor = new PaypalPaymentProcessor();

makePayment(creditCardProcessor, 100); // Output: Processing credit card payment for $100
makePayment(paypalProcessor, 50); // Output: Processing PayPal payment for $50
In this example, the PaymentProcessor class is the base class that defines the common behaviour for processing payments. It has a single method, processPayment, which is responsible for processing the payment.
The CreditCardPaymentProcessor and PaypalPaymentProcessor classes are derived classes that inherit from PaymentProcessor. They provide a specific implementation for processing payments via credit cards and PayPal, respectively.
The makePayment function takes a paymentProcessor object (which can be an instance of any class derived from PaymentProcessor) and an amount as parameters. It then calls the processPayment method on the paymentProcessor object.
By adhering to the Liskov Substitution Principle, we can substitute an instance of CreditCardPaymentProcessor or PaypalPaymentProcessor wherever an instance of PaymentProcessor is expected. This allows us to pass different payment processors interchangeably to the makePayment function without affecting the correctness or behavior of the code.
In a real-life scenario, this flexibility enables the application to support multiple payment methods seamlessly. Adding new payment processors (e.g., BitcoinPaymentProcessor or ApplePayPaymentProcessor) as derived classes wouldn't require modifying existing code, thereby adhering to the Open/Closed Principle as well.
Let us look at one more example:
Suppose you have a functional component called UserList fetches a list of users from an API and renders them in a UI list. To test this component, you want to mock the API call and provide test data without actually making the network request.
Here's an example demonstrating it can be done:
// UserList.js
import React, { useState, useEffect } from 'react';
import { fetchData } from './api'; // Assuming there's an api.js file with the fetchData function

const UserList = () => {
  const [users, setUsers] = useState([]);

  useEffect(() => {
    async function fetchUsers() {
      const data = await fetchData(); // API call to fetch users
      setUsers(data);
    }

    fetchUsers();
  }, []);

  return (
    <div>
      <h2>User List</h2>
      <ul>
        {users.map((user) => (
          <li key={user.id}>{user.name}</li>
        ))}
      </ul>
    </div>
  );
};

export default UserList;
In this example, the UserList component fetches the list of users using the fetchData function from an api.js file. It uses React's useState and useEffect hooks to manage the component's state and trigger the API call.
Now, let's look at how LSP can be applied in testing and mocking:
// UserList.test.js
import React from 'react';
import { render } from '@testing-library/react';
import UserList from './UserList';

jest.mock('./api', () => ({
  fetchData: jest.fn().mockResolvedValue([
    { id: 1, name: 'John Doe' },
    { id: 2, name: 'Jane Smith' },
  ]),
}));

test('renders user list correctly', async () => {
  const { findAllByText } = render(<UserList />);
  const userListItems = await findAllByText(/John Doe|Jane Smith/);

  expect(userListItems).toHaveLength(2);
});
In the test file, we mock the fetchData function from the api.js file using the jest.mock function. We provide a mock implementation for fetchData that returns the test data directly instead of making the actual API call. This allows us to isolate the UserList component and test it independently of the API.
We then render the UserList component using a testing library like @testing-library/react. By doing so, we can assert that the component correctly renders the user list based on the test data.
By applying LSP in testing and mocking, we can substitute the actual API call with a mock implementation that provides predetermined test data. This allows us to test the UserList component in isolation, verifying its behaviour without relying on the network or actual API responses.
Here are a few real-life situations where the LSP can be applied:
Component Inheritance: In frontend frameworks like React or Angular, component inheritance is a common practice. When creating a hierarchy of components, it's important to ensure that the child components can be substituted for their parent components without causing any issues. By adhering to LSP, you can design your components in a way that child components inherit the expected behaviour and props from their parent components. This allows you to replace parent components with their child components wherever needed without breaking the application's functionality.
State Management: State management is crucial in frontend applications, and libraries like Redux or Vuex provide ways to manage application state. When defining state management modules, you can follow LSP by designing actions, reducers, and selectors with a consistent interface. This allows you to substitute different state management implementations, such as switching from Redux to MobX, without having to rewrite or modify the code that relies on the state management system.
Testing and Mocking: In frontend testing, it's common to use mocking libraries to simulate or replace certain dependencies or external services. By adhering to LSP, you can create mock objects or functions that implement the same interface as the original dependencies. This ensures that the mock objects can be substituted for the real dependencies without causing any issues in the test cases. LSP helps in writing maintainable and flexible tests by providing interchangeable substitutes for dependencies.
Interface Segregation Principle
The Interface Segregation Principle focuses on the idea that clients should not be forced to depend on interfaces they do not use. It emphasizes the importance of designing fine-grained and specific interfaces to avoid unnecessary dependencies and ensure that clients only depend on what they need.
Here's an example to illustrate this principle.
Suppose you have a website with a feature that allows users to authenticate via different providers such as Google, Facebook, and Twitter. Each provider has a unique set of authentication methods. One approach to implementing this feature in JavaScript would be to create a single authentication interface with all the methods required for all providers, as shown below:
class Authentication {
  authenticateWithGoogle() {
    // Authenticate using Google API
  }

  authenticateWithFacebook() {
    // Authenticate using Facebook API
  }

  authenticateWithTwitter() {
    // Authenticate using Twitter API
  }
}
However, this violates the Interface Segregation Principle because clients of this interface may have to depend on methods that are not relevant to them. For example, if you only want to allow authentication via Google, you would still have to create an instance of this class and call methods related to Facebook and Twitter, even though they are not being used.
A better approach would be to create separate interfaces for each provider, as shown below:
class GoogleAuthentication {
  authenticate() {
    // Authenticate using Google API
  }
}

class FacebookAuthentication {
  authenticate() {
    // Authenticate using Facebook API
  }
}

class TwitterAuthentication {
  authenticate() {
    // Authenticate using Twitter API
  }
}
Each interface now only contains the methods that are required for authentication with that provider, avoiding unnecessary dependencies and improving the code's modularity and flexibility. Clients can now depend only on the interface that is relevant to them, without being forced to depend on methods they don't use.
After seeing this example, you might be thinking that this ISP and SRP do the same things only. You are right both principles that promote good software design, but they focus on different aspects of the code.
SRP VS ISP
The Single Responsibility Principle (SRP) states that a class should have only one reason to change, meaning it should have a single responsibility. It emphasizes that a class should be focused on a single task or responsibility and should not be burdened with unrelated functionalities. The goal of SRP is to improve code organization, readability, and maintainability by keeping classes focused and cohesive.
On the other hand, the Interface Segregation Principle (ISP) states that clients should not be forced to depend on interfaces they do not use. It emphasizes that interfaces should be specific to the needs of the clients, avoiding unnecessary dependencies and providing only the methods required for each client. The goal of ISP is to improve modularity, flexibility, and reusability by designing interfaces that are tailored to specific client requirements.
In other words, SRP focuses on the responsibilities and behaviours of individual classes, ensuring that each class has a single responsibility. It helps in organizing code and keeping it maintainable. On the other hand, ISP focuses on the usage of interfaces and the relationships between clients and interfaces. It ensures that clients are not burdened with unnecessary dependencies and promotes modular and flexible code.
While SRP is concerned with the internal structure of classes, ISP is concerned with the external contract or interaction points of classes through interfaces. Both principles work together to create well-designed, modular, and maintainable code, but they address different aspects of software development.
Dependency Inversion Principle
The Dependency Inversion Principle emphasizes two key concepts: high-level modules should not depend on low-level modules, and both should depend on abstractions. In simpler terms, DIP states that:
Abstractions should not depend on details. This means that higher-level modules or classes should not depend on lower-level modules or classes directly. Instead, they should depend on abstractions or interfaces.
Details should depend on abstractions. Lower-level modules or classes should depend on the same abstractions or interfaces that higher-level modules depend on. They should be designed to implement or fulfil the contracts defined by those abstractions.
By following the DIP, you can achieve loose coupling between modules, improve modularity, and enable easier maintenance and extensibility of the codebase.
To better understand DIP, consider a real-life analogy of a team working together on a project. Each team member has specific skills and responsibilities, but they all work towards a common goal. Here's how DIP can be illustrated:
High-level modules: These are like team leaders or project managers. They define the overall structure and goals of the project but do not directly implement the details. They depend on abstractions or interfaces, not on specific team members.
Low-level modules: These are like individual team members who possess specific skills or expertise. They implement the details required to achieve the project goals. However, they depend on the same abstractions or interfaces that the high-level modules depend on.
Abstractions: These are like the project requirements or contracts that define what needs to be accomplished. Both high-level and low-level modules depend on these abstractions, ensuring that everyone is aligned towards the same goals.
Here's an example to illustrate this principle.
Imagine you're building a blog application where users can write and publish blog posts. The application needs to send email notifications whenever a new blog post is published. Instead of directly depending on a specific email service, you can apply DIP to achieve better modularity and flexibility.
// Abstraction (Interface)
class NotificationService {
  sendNotification(message) {
    throw new Error("Method not implemented");
  }
}

// Concrete implementation of the NotificationService using a specific email service
class EmailNotificationService extends NotificationService {
  sendNotification(message) {
    // Logic to send an email notification
    console.log("Sending email notification:", message);
  }
}

// High-level module
class BlogPostService {
  constructor(notificationService) {
    this.notificationService = notificationService;
  }

  publishBlogPost(blogPost) {
    // Logic to publish the blog post
    console.log("Publishing blog post:", blogPost);

    // Send notification using the injected notification service
    this.notificationService.sendNotification("New blog post published: " + blogPost.title);
  }
}

// Usage
const emailNotificationService = new EmailNotificationService();
const blogPostService = new BlogPostService(emailNotificationService);

const blogPost = {
  title: "My First Blog Post",
  content: "Hello, world! This is my first blog post.",
};

blogPostService.publishBlogPost(blogPost);
In this example, we have:
The
NotificationServiceinterface: This abstraction defines the contract for sending notifications. It declares thesendNotificationmethod.The
EmailNotificationServiceclass: This is a concrete implementation of theNotificationServiceinterface. It provides the specific implementation to send email notifications.The
BlogPostServiceclass: This is the high-level module responsible for publishing blog posts. It depends on theNotificationServiceabstraction via dependency injection. The specific implementation (in this case,EmailNotificationService) is injected during instantiation.
By applying DIP, the BlogPostService depends on the abstraction (NotificationService), not on a specific email service. This allows you to easily switch or add other notification services by creating new implementations of the NotificationService interface.
For example, if you later decide to send notifications through a different service, such as SMS or push notifications, you can create a new class implementing the NotificationService interface and inject it into the BlogPostService without needing to modify the BlogPostService itself. This ensures that changes to the notification mechanism don't affect the high-level module.
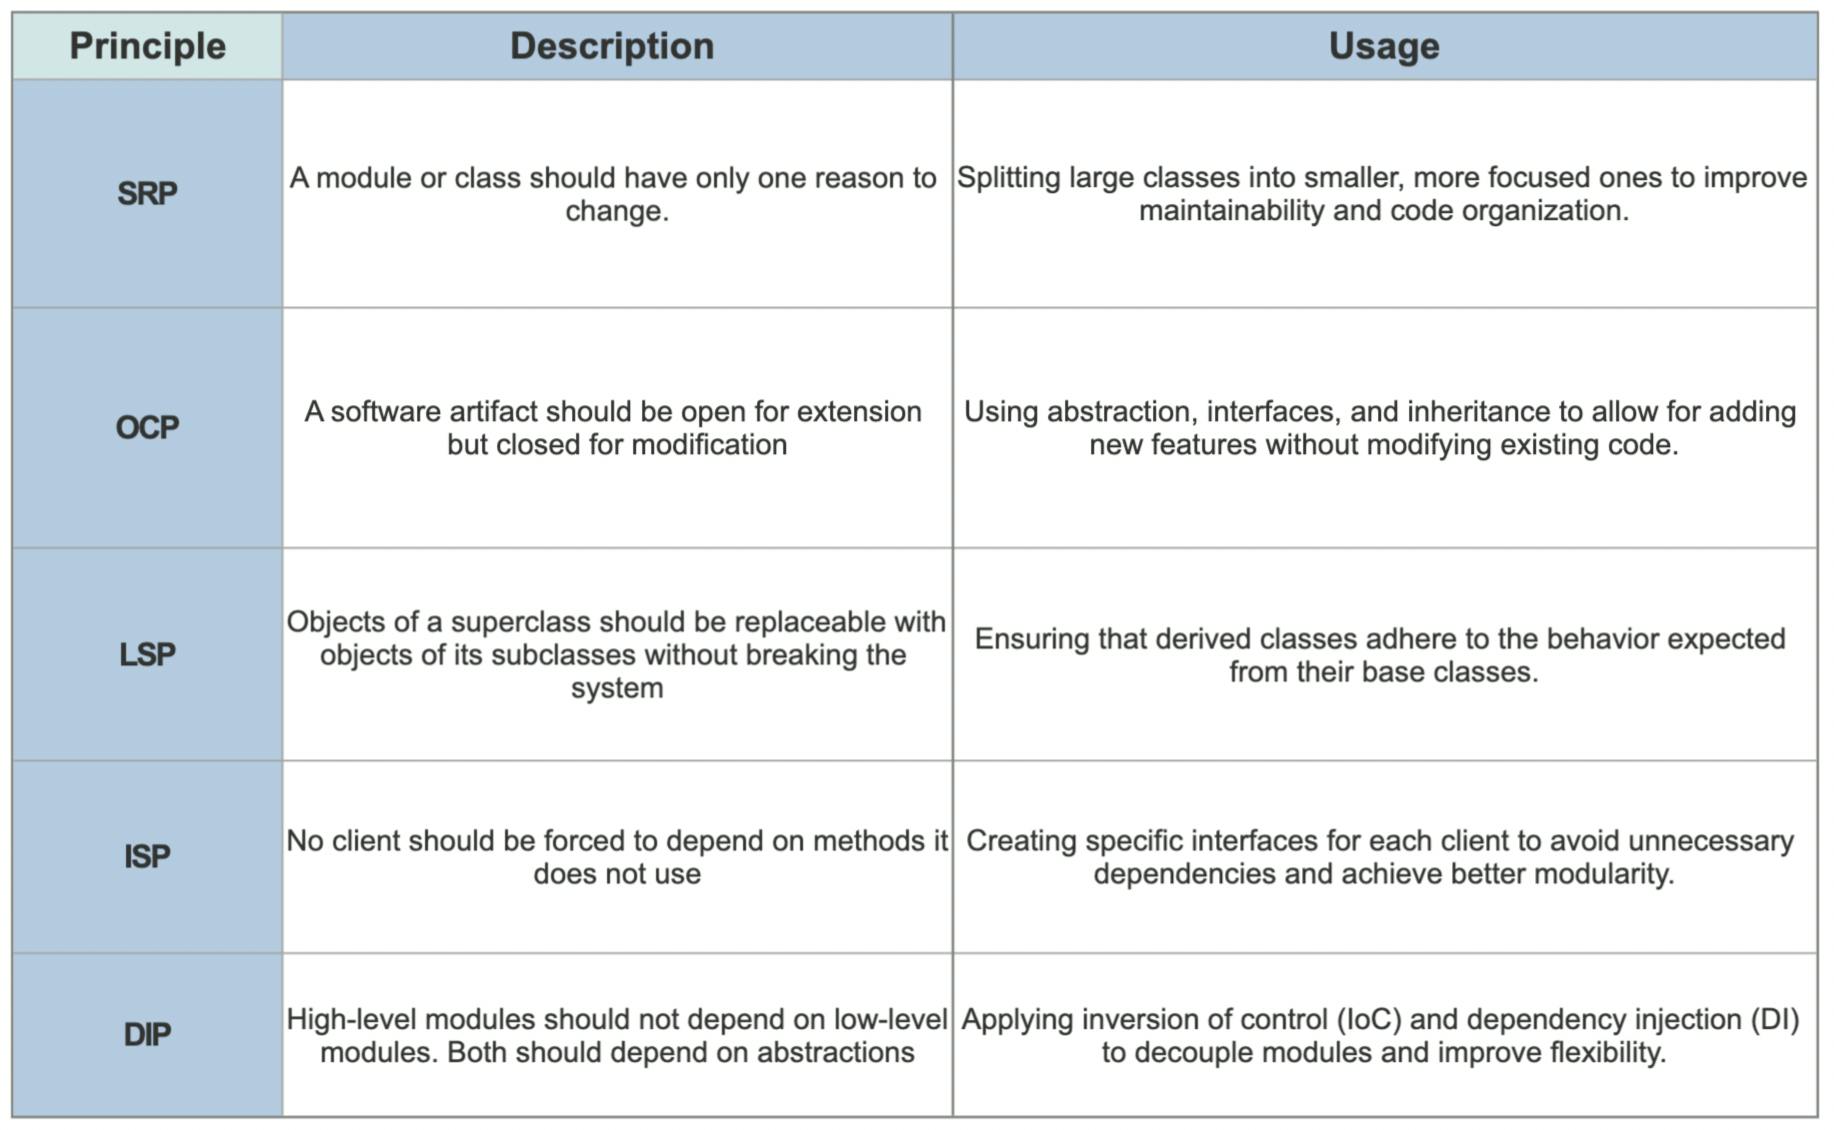
Summary
Here's a TL;DR summary of the key takeaways from this blog:
Conclusion
In conclusion, the SOLID principles provide invaluable guidelines for software developers to create code that is robust, maintainable, and adaptable. By adhering to these principles, you can achieve:
Code Maintainability: The principles encourage modular and well-structured code, making it easier to understand, modify, and debug over time.
Flexibility and Extensibility: By designing your code to be open for extension and closed for modification, you can easily add new features or functionalities without impacting existing code.
Testability: The principles promote code that is easier to test, allowing for more comprehensive test coverage and faster identification of issues.
Code Reusability: By creating smaller, single-responsibility modules, you increase the potential for reusing code in different parts of your application or in future projects.
Collaboration: Following SOLID principles makes it easier for multiple developers to work together on a codebase, as each module has clear responsibilities and interfaces.
Remember that while the SOLID principles provide valuable guidelines, they are not strict rules to be blindly followed. Use your judgment and consider the specific requirements and context of your project.
By embracing the SOLID principles and continuously striving for clean and well-designed code, you can enhance the quality, maintainability, and longevity of your software applications. So go ahead, apply these principles in your development journey, and witness the positive impact they can have on your codebase and development process. Happy coding! :)
Here are some captivating articles worth exploring
The following tools were utilized in the creation of this blog:
Canva (https://www.canva.com/): This platform was used to design the blog cover, providing an aesthetically pleasing visual representation.
SmartDraw Cloud (https://cloud.smartdraw.com/): The table featured in the blog was created using SmartDraw Cloud, allowing for an organized and structured presentation of information.
OpenAI Chat (https://chat.openai.com/): OpenAI's Chat tool played a vital role in content polishing, assisting in refining the text and improving its overall quality.